

If you want to create a table in your Blog's Post, you can easily create it by adding some html script in blogger's post editor. Tables are a useful way to display information particularly tabulated information. Tables are good whenever you want to align information so that it is easy to read and understand. You can add CSS styling to the table to improve the look and functionality of the table like adding extra rows, a background color to the header, a border, a caption, change the size of the table, center align the table and more.
Adding a Table to Blogger Blog's Posts
1. Log in to Blogger and create a new post or edit an existing Post.

(Note: The final look of the Table will depend on your Template and template's css if you are using custom Template)
1.

<center>
<style type="text/css">.abe br { display: none }</style>
<div class="abe">
<table border="2" bordercolor="#0033FF" cellpadding="20" cellspacing="3" style="background-color: #e7e7e7; width: 70%;">
<tbody>
<tr>
<th>Heading</th>
<th>Heading</th>
<th>Heading</th>
</tr>
<tr>
<td>Label</td>
<td>Label</td>
<td>Label</td>
</tr>
<tr>
<td>Label</td>
<td>Label</td>
<td>Label</td>
</tr>
<tr>
<td>Label</td>
<td>Label</td>
<td>Label</td>
</tr>
</tbody></table>
</div>
</center>
You can make changes to the values in the above Code to get the table as you need. If you don't want the table to be centered then remove <center> & </center> from the code.
The values you can change in the code are following:
(Change the letters and numbers denoted in Red)
- border="2" (Border width)
- bordercolor="#0033FF" (Border color)
- style="background-color: #e7e7e7; (Background Color)
- width: 70%; (Width of the Table)
- cellpadding="20" (Space between the border of table cells)
- cellspacing="3" (Space between table cells, make it "0" to remove the space between table cells)
2.

<center>
<style type="text/css">.abe br { display: none }</style>
<div class="abe">
<table border="2" bordercolor="#0033FF" cellpadding="20" cellspacing="3" style="background-color: #e7e7e7; width: 70%;">
<tbody>
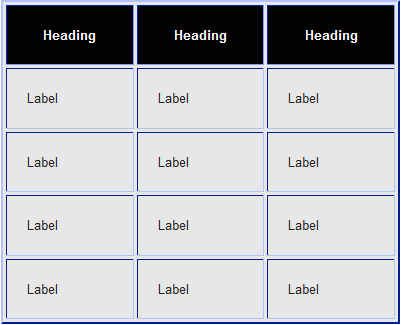
<tr style="background-color: #000000; color: #ffffff; padding-bottom: 4px; padding-top: 5px;">
<th>Heading</th>
<th>Heading</th>
<th>Heading</th>
</tr>
<tr>
<td>Label</td>
<td>Label</td>
<td>Label</td>
</tr>
<tr>
<td>Label</td>
<td>Label</td>
<td>Label</td>
</tr>
<tr>
<td>Label</td>
<td>Label</td>
<td>Label</td>
</tr>
</tbody></table>
</div>
</center>
<style type="text/css">.abe br { display: none }</style>
<div class="abe">
<table border="2" bordercolor="#0033FF" cellpadding="20" cellspacing="3" style="background-color: #e7e7e7; width: 70%;">
<tbody>
<tr style="background-color: #000000; color: #ffffff; padding-bottom: 4px; padding-top: 5px;">
<th>Heading</th>
<th>Heading</th>
<th>Heading</th>
</tr>
<tr>
<td>Label</td>
<td>Label</td>
<td>Label</td>
</tr>
<tr>
<td>Label</td>
<td>Label</td>
<td>Label</td>
</tr>
<tr>
<td>Label</td>
<td>Label</td>
<td>Label</td>
</tr>
</tbody></table>
</div>
</center>
More values that you can change in the above code are denoted in red.
3.
<center>
<style type="text/css">.abe br { display: none }</style>
<div class="abe">
<table border="2" bordercolor="#0033FF" cellpadding="20" cellspacing="3" style="background-color: #e7e7e7; width: 70%;">
<tbody>
<tr style="background-color: black; color: white; padding-bottom: 4px; padding-top: 5px;">
<th>Heading</th>
<th>Heading</th>
<th>Heading</th>
</tr>
<tr>
<td>Label</td>
<td>Label</td>
<td>Label</td>
</tr>
<tr>
<td>Label</td>
<td>Label</td>
<td>Label</td>
</tr>
<tr>
<td>Label</td>
<td>Label</td>
<td>Label</td>
</tr>
<tr>
<td>Label</td>
<td>Label</td>
<td>Label</td>
</tr>
</tbody></table>
</div>
</center>
To add more rows, just add code as much you want like in the above code.
4.

<center>
<style type="text/css">.abe br { display: none } caption {caption-side:bottom;} </style>
<div class="abe">
<table border="2" bordercolor="#0033FF" cellpadding="20" cellspacing="3" style="background-color: #e7e7e7; width: 70%;">
<caption>My Table Caption</caption>
<tbody>
<tr style="background-color: black; color: white; padding-bottom: 4px; padding-top: 5px;">
<th>Heading</th>
<th>Heading</th>
<th>Heading</th>
</tr>
<tr>
<td>Label</td>
<td>Label</td>
<td>Label</td>
</tr>
<tr>
<td>Label</td>
<td>Label</td>
<td>Label</td>
</tr>
<tr>
<td>Label</td>
<td>Label</td>
<td>Label</td>
</tr>
<tr>
<td>Label</td>
<td>Label</td>
<td>Label</td>
</tr>
</tbody></table>
</div>
</center>
More values you can change in the code:
(change the code denoted in red below)
- caption {caption-side:bottom;} (caption's side like up,left,right)
- <caption>My Table Caption</caption> (replace it with your Caption)
5.

<center>
<style type="text/css">.abe br { display: none }tr.eb td {background-color: #FFB400; color: black;} caption {caption-side:bottom;} </style>
<div class="abe">
<table border="2" bordercolor="#0033FF" cellpadding="20" cellspacing="3" style="background-color: #e7e7e7; width: 70%;">
<caption>My Table Caption</caption>
<tbody>
<tr style="background-color: black; color: white; padding-bottom: 4px; padding-top: 5px;">
<th>Heading</th>
<th>Heading</th>
<th>Heading</th>
</tr>
<tr>
<td>Label</td>
<td>Label</td>
<td>Label</td>
</tr>
<tr class="eb">
<td>Label</td>
<td>Label</td>
<td>Label</td>
</tr>
<tr>
<td>Label</td>
<td>Label</td>
<td>Label</td>
</tr>
<tr class="eb">
<td>Label</td>
<td>Label</td>
<td>Label</td>
</tr>
</tbody></table>
</div>
</center>
Add class="eb" above the row code where you want as shown above.
More values you can change in the code:
(change the code denoted in red below)
- {background-color: #FFB400; (background color)
- color: black; (color of text)

- {background-color: #FFB400; (background color)
- color: black; (color of text)
6.
If you want a list table or a vertical row for numbering then use the below code.
<center>
<style type="text/css">.abe br { display: none } caption {caption-side:bottom;} </style>
<div class="abe">
<table border="2" bordercolor="#0033FF" cellpadding="20" cellspacing="3" style="background-color: #e7e7e7; width: 70%;">
<caption>My Table Caption</caption>
<tbody>
<tr style="background-color: black; color: white; padding-bottom: 4px; padding-top: 5px;">
<th style="width: 15%;">No.</th>
<th>Heading</th>
<th>Heading</th>
</tr>
<tr>
<td>1.</td>
<td>Label</td>
<td>Label</td>
</tr>
<tr>
<td>2.</td>
<td>Label</td>
<td>Label</td>
</tr>
<tr>
<td>3.</td>
<td>Label</td>
<td>Label</td>
</tr>
<tr>
<td>4.</td>
<td>Label</td>
<td>Label</td>
</tr>
</tbody></table>
</div>
</center>
Change the value of width in above code (denoted in Red) to your desired width.
4. Now add the data to the table. Add your data to each cells in the table (denoted as Header & Label in the code), you can add text, hyperlinks, image.
You can also create the table online. Go to Tableizer and copy paste your cells and get the HTML script.


0 Comments